• Home
  • Blog
  • Basics + Pantry Staples
  • Preservation
  • Desserts & Sweets
  • Breakfast
  • Entrees & One-dish Meals
  • Salads + Sides
  • Soups & Stews
  • 10 Minute Recipes
  • About
  • Say Hello
  • Portfolio
Menu

of the dirt

Street Address
San Diego, CA
Phone Number
an exploration of food and culture

Your Custom Text Here

of the dirt

  • Home
  • Blog
  • Recipes
    • Basics + Pantry Staples
    • Preservation
    • Desserts & Sweets
    • Breakfast
    • Entrees & One-dish Meals
    • Salads + Sides
    • Soups & Stews
    • 10 Minute Recipes
  • About
  • Say Hello
  • Portfolio

Heirloom Apple Pie (create your own family recipe)

November 20, 2016 Sarah Ward
Heirloom Apple Pie_031_sRGB.jpg

To many families, holiday traditions just aren't complete until Grandma's (or Aunt Martha's, or Uncle Pete's) pie has been passed around the table. Like an heirloom, these revered recipes often come to us from generations past and connect us to the larger whole of our family. I grew up with two Southern grandmothers (well, one was technically Cuban but adopted by the south), so my family is certainly not short on heirloom recipes. However, a good holiday pie is conspicuously absent, so this season I set out to create one. I came up with a few tips during this process that I'd like to share so that you can start your own holiday tradition.

How to test your pie flavors 

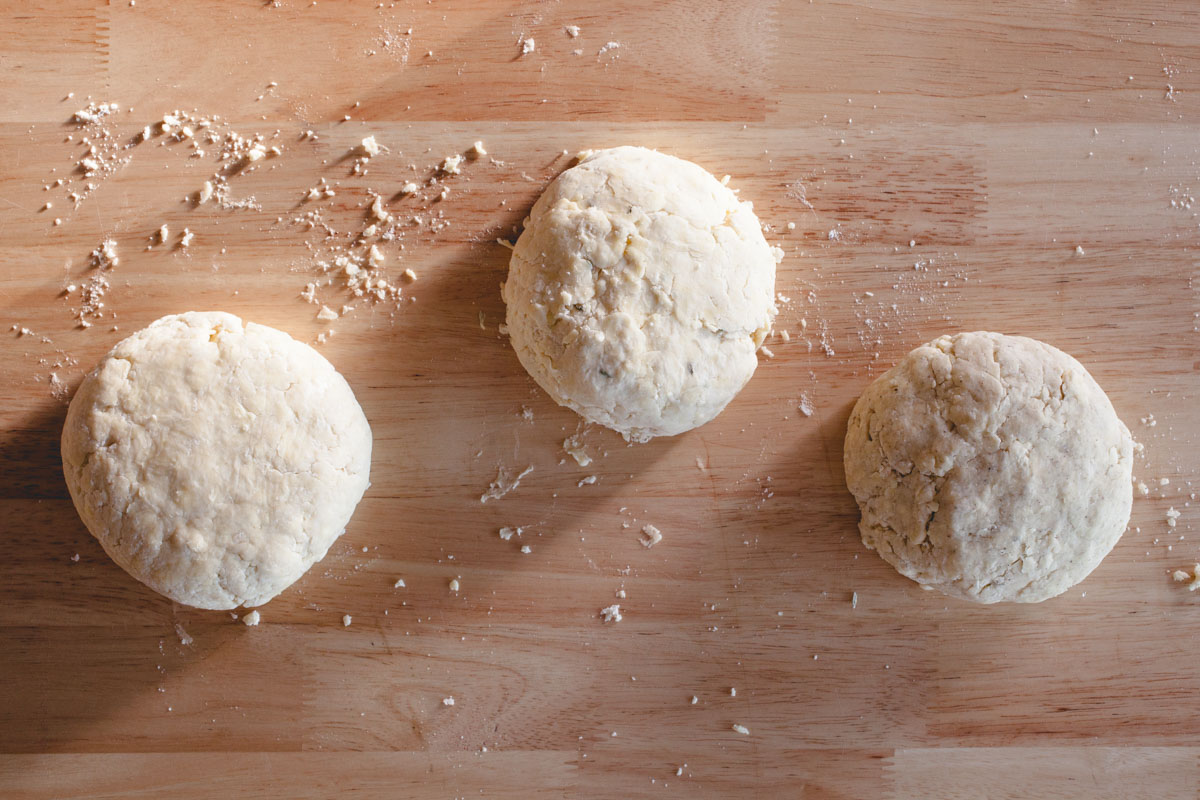
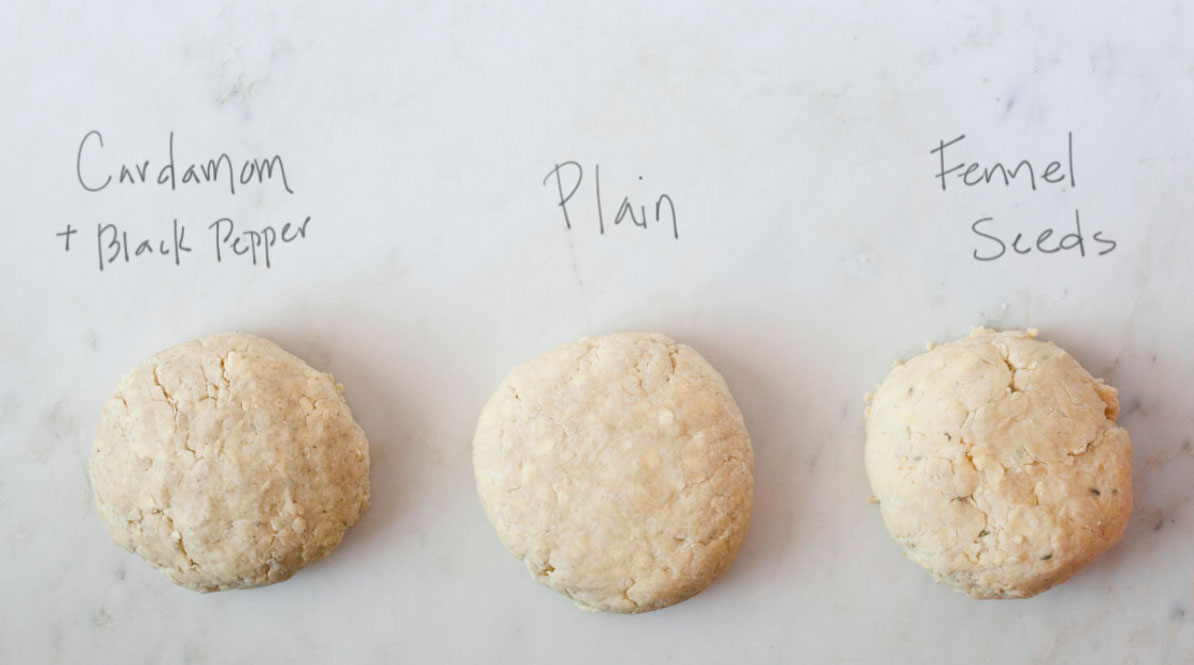
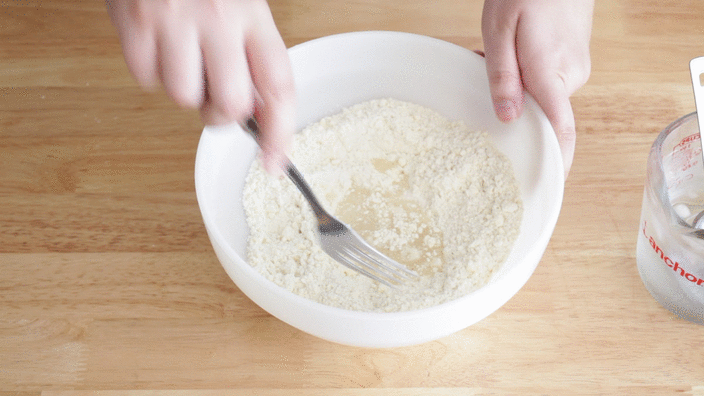
Ok, I know that the hardest part about putting a pie recipe together can be knowing where to start. It can be so frustrating to put in the work peeling all of those apples and rolling out crust only to end up with flavors that just don't dazzle. My suggestion here is to start with some small-scale tests. Cooking apples with a few different spice mixes on the stovetop is quick and an easy way to experiment without having to commit to a whole pie (side note: this technique is also great for a stand alone dessert on those nights when you wanna be easy but still treat yo'self). I've broken this process down to a few simple steps and put them into a guide to help you organize the process.

  • Download the recipe testing chart (via the button below)

  • Choose a variety of apples to test with - both tart and sweet, soft and firm

  • Get creative with your spices and flavors - this is the perfect time to try things that you might be unsure of how they'll taste. There's a sheet included in the download with a guide to apples and complimenting flavors. Google is a great resource here, as well. Simply search for "Spices (or fruits, nuts, flavors...) that compliment _____" and go from there. `

  • Once you've determined what spices and flavors are your favorite, scale the recipe as denoted on the sheet. The basic formula is below:

    • Measurement of spices/other flavorings used in test x # of apples used in a full pie = Total measurement for a full pie

  • Follow the recipe below for making your full heirloom pie!

Note about scaling: Small scale tests may not always translate perfectly to the full-size version. I recommend trying to use the same size apples in your pie that you tested. Or, given that apples naturally vary in size, premix your spices to your full scale and add them into your apples a teaspoon at a time - this is mostly important for your first full-scale pie. If you track your teaspoon measurements, you can make up a big batch of heirloom pie spices and just list your recipe as "3 tsp of family spice mix." This would be a great thing to keep on hand or give a jar along with the pie recipe to your family as a personalized gift (and win best gift giver of the year).

Recipe Testing Chart (click to download)

Share your family's creation with #heirloomapplepie and #ofthedirtrecipes!


heirloom Apple Pie

  • 5-7 apples (a variety of tart and sweet)

  • 1 tablespoon sugar per apple (half brown, half granulated is recommended, or try coconut sugar)

  • Heirloom Test Recipe spice mixture (or 3-4 tsp spices of choice)

  • 1 tablespoon all-purpose flour or tapioca flour per apple

  • 2 Basic Pie Crusts

  • Egg wash (1 egg beaten with 1 Tbsp water; optional)

  • Sugar for finishing (optional)

  1. Peel, core and slice your apples into ⅛ - ¼” thick slices. Cut into bite-sized pieces or leave whole and place in a large mixing bowl. Add in sugar and spices and toss to coat. If you are using your tested heirloom spices for the first time, it is recommended to add the mix in one teaspoon at a time. Taste an apple slice as you go and stop when you feel it is seasoned to your liking. Cover and let stand for 3 hours or chill overnight. (You can skip this step, but letting the apples macerate will help reduce the amount the fruit shrinks when baking.) Stir flour into apples.

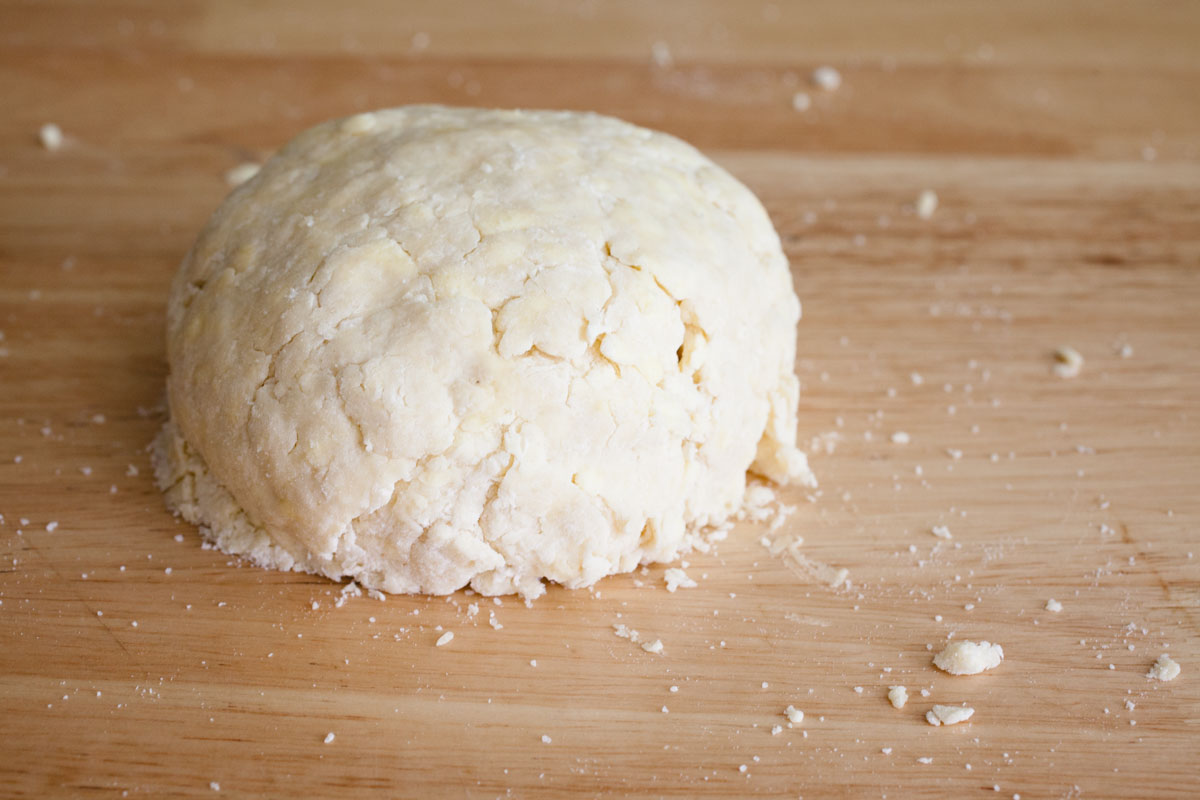
  2. Roll out one disk of pie dough and fill your 9” pie pan. Trim or leave the overhang depending on how you’d like to decorate the crust. Fill your crust with apples, gently pressing them down as you go - this will help them settle and keep your pie from developing a gap between the apples and top crust. Dome apples in the center if they rise above the pan’s edge.

  3. Roll out the second pie dough and cover the top of the apples in any design desired. If covering with a full crust and not a lattice or cut shapes, be sure to cut a few slits in the top for ventilation. Trim edges of dough to about 1-inch beyond the edge of the pan. Fold edges over and crimp as desired. Brush with the egg wash and sprinkle with sugar, if desired. Freeze pie while oven preheats.

  4. Preheat oven to 415F

  5. Place the pie on a lined baking sheet. Bake in the center of your oven for 15 minutes. Reduce the heat to 350F and bake for an additional 45 - 50 minutes. Cool on a rack for a minimum of 30 minutes before serving.

Apple varieties I used in my final pie.

Apple varieties I used in my final pie.

Filling Apple Pie.gif
In Dessert, Fall, Pie, Recipe, Winter, Holiday Recipes Tags pie, Dessert, Apple, Heirloom Recipe, Thanksgiving, Christmas, Holiday Pie
1 Comment

Basic Pie Dough

November 19, 2016 Sarah Ward
Basic Pie Crust_016_sRGB.jpg

The #1 reason people tell me they don't make pie at home is that they're intimidated by making the crust.  I often hear things like 'doesn't it take a skilled baker?' or 'isn't the pre-made stuff just as good?'. I am here to tell you that both of those things are far from true.

To move past this fear, the first step is to admit this is a totally rational feeling. You should never feel silly for being intimidated by something you haven't tried before. The second step is to know, understand and believe that it is actually easy. You may be thinking "of course she thinks it's easy because she cooks for a living and has done this a bunch." I thank you for giving me the benefit of the doubt, but in reality, it's just really not that hard. I will say, it's kind of messy, so be prepared for a bit of kitchen clean up. The end result is totally worth it, though. Making pie dough from scratch is about to become the easiest part of making pie and it's freakin' delicious. With that said, if you try this and mess up the first time, try it again. Don't give up on yourself (or pie!) that easily!

Now, let's begin. If you've done what I often do, and just scrolled through this post you're probably thinking that this looks like a heavy post, filled with lots of information, but don't let that deter you. It's information that is helpful to know in order to make your pie dough creating experience much better. It's kind of like checkers - once you learn a few basic moves, it's actually really simple.

Flour, Fat and Moisture

Pie dough is all about ratios and the only thing that is "hard" about it is understanding how flour, fat and moisture work together. 

A brief note about flour: I use the same brand of flour (Bob's Red Mill) anytime I make pie crusts. This way, I know how it will react to my liquid. The important thing to remember here is brand doesn't really matter. Consistency does.  

LIQUID TO FLOUR (GENERAL) RATIO  

  • 1/4 cup flour : 1 Tbsp liquid

This ratio is generalized, meaning you may end up using a little more or less liquid to flour depending on how dry your flour is or how humid the air in your kitchen is (wait don't leave - it's not really that complicated!). We'll ignore the chemistry behind this to simplify it - all you need to learn is how the dough should look (see graphics in the Visual Guide at the bottom of this post). Once you know that, you can tell if it needs more water or not. If you aren't confident on whether your dough is too dry, just remember it's always better to err on the side of too much liquid than too little, here. Any liquids you add to your dough should be ice cold. 

 FAT TO FLOUR RATIO

  • 1/4 cup flour : 2 Tbsp Fat

In this instance, any 'solid' fat will work. You can use butter, shortening (even the vegan shortening), lard, or others like coconut or palm oil as the fat in your crust. (All of these really do work, just not all the same way. Once you've got the basics down, start experimenting!) I prefer butter - the fresher the better, because mmmm...fresh butter - but whichever you use just make sure that it is cold. Heat is also an enemy of flakey crust, until we bake, so be sure all of your ingredients stay cold while working your dough. If using shortening or lard, I suggest placing it in the freezer for 15 minutes before adding it to your crust. If using butter, keep the sticks in the freezer and cut them when ready to use. For blending the fat into the flour, you can use a food processor, pastry blender, two knives or even your hands. My hands are naturally hot and end up melting the butter too quickly, so I prefer a pastry blender over knives and a food processor over everything.

Alcohol or vinegar

Using a small amount of alcohol or vinegar in your pie crust will promote tenderness of the crust and guard against overworking the dough. They both inhibit our frenemy Gluten from forming when the water and flour combines. Gluten is great in bread, but not usually pastry - it causes shrinkage in the oven and can make the crust tough.

Temperature

As I mentioned earlier, until you're ready to bake, heat is the enemy of making good pie dough. In order to get that delicious flaky crust, the fat needs to stay in solid pieces while being worked into the dough. If it melts and breaks down too much, it will create a tough dough. Try to touch your dough as little as possible - this is why I prefer using a food processor over my hands to work in the fat. Ambient temperature can influence your dough, as well. If it's warmer than 72 degrees in your house, I suggest placing all of your ingredients and mixing bowl in the freezer for at least 15 minutes prior to use, this will help to keep your fat cold for longer as you work it. 

Basic Pie Crust_021_graphic_sRGB.jpg

Flavoring Pie Crust

When mixing the flour, sugar and salt together, you can add in an array of spices and herbs to flavor your crust. This is a great way to add additional subtle flavor to your pies that compliments its filling, without competing with it. 

A few suggestions, you ask? How do these sound:

  • Peach Pie with Cinnamon Crust

  • Apple Pie with Fennel Seed Crust

  • Cranberry Pie with Orange Zest and Ginger Crust

  • Key Lime Pie with Lime Zest Crust

  • Pot Pies with Sage Crust

  • Quiche with Rosemary Crust


Basic Pie Dough

This recipe makes dough for a single crust (double the recipe for a double-crust pie).

  • 1½ cups all-purpose flour

  • ½ cup (1 stick) unsalted butter, cubed and cold

  • 1 tbsp granulated sugar (for savory crust, reduce to 1 tsp)

  • ½ tsp kosher salt

  • Spices or minced herbs (optional)

  • 6 to 8 tablespoons ice water

  • 2 teaspoons cider vinegar

Place the flour, sugar, salt and any spices or herbs in the bowl of your food processor and pulse, just to combine them. Add in the chunks of butter and pulse about 4 times, or until the butter pieces are the size of almonds (This will vary on the size and power of your processor and the hardness of the butter.)

Dump the flour mixture into your mixing bowl and make a well in the middle of it. Stir together ice water and vinegar. Start by adding 5 tablespoons of water mixture to flour mixture. With a fork, begin fluffing the mixture together. Continue just until the water is mixed in (1), adding additional tablespoons of liquid if too many dry spots remain. (I find it helpful to rotate the bowl as I work.) The dough is ready when about a quarter of the flour is still slightly dry and crumbly, but the rest is shaggy and clumping together. To test, grab a small amount in your forefingers and pinch it together. If it cracks and falls apart, work in another tablespoon of water. If it sticks together and keeps form, you’re set. The dough will still be loose but don’t panic! That’s how you want it. If it doesn't look like this yet, continue adding your ice water, one tablespoon at a time, and work it in the same way with your fork.

Pour the dough onto a clean work surface. To begin, place your hands on either side of the dough and start pressing them toward the center. Repeat this move a few times to form the loose dough into a rough dome shape. Flip and fold as needed to incorporate the dry portions, but do not knead it like you would bread (1). Once the dough has formed into a singular mass, flatten your dome shape into a chubby disk (2). Wrap tightly in plastic wrap and refrigerate for at least 3 hours, or overnight if you can. You can leave the dough in the fridge for up to three days, which means you can get a jump on your pie prep.  (If you want to prep your dough more than three days ahead keep it in the freezer and allow at least a day for it to thaw in the refrigerator.)

When you're ready to roll out the dough, allow the wrapped disk to sit out on your counter for a few minutes to warm up. Lightly flour your work surface and the top of your unwrapped dough disk. Starting in the middle of your disk and roll your pin upwards with medium pressure, all the way through the edge of the dough. Move the pin back to the middle and roll your pin towards you with the same technique. Rotate your dough a quarter turn and repeat. Continue until the dough is about 1/8" in thickness. (Rotating the dough as you roll it limits the amount it sticks to your surface. If you do end up with a stuck crust, a bench scraper is a very helpful tool for unsticking it. If you need to add more flour, just gently lift and sprinkle more where needed. If any major cracks appear as you roll, gently press them back together and continue rolling.)

When you've reached the right thickness, fold the dough in quarters and to transfer it to your pie pan. Unfold and gently fit the crust to form to the pan's shape. If you plan on crimping the edges, trim the excess to leave about an inch of overhang. Fold the excess under itself and crimp. You can also trim to the edge of the pie pan if leaving plain, adding cutouts, or putting on a top crust. 

Footnotes: 1. Working the dough, either with a fork or kneading with your hands, will encourage gluten development which not pleasant in pie crust. Be as sparing as you can with mixing and kneading. // 2. It is normal to have some minor cracks in or around the edge of the dough disk. Parts of the dough will still be drier than others - this is where resting the dough in the refrigerator is crucial. As the dough rests, the flour will absorb liquid, allowing those cracks to be repaired or disappear when rolling it out.


Visual Reference For making dough

Use a folding motion when mixing your dough to help keep the crust tender. Rotating the bowl at the same time helps ensure even mixing. The dough will look shaggy when finished (right). 

The Pinch Test: Take a small clump of dough in your hand and press. If your dough sticks and holds shape, you've added enough water.

The Pinch Test: If your dough stick and holds shape, you've added enough water.

Pie dough will look very different than bread or pizza dough. Small cracks in the surface are totally normal and acceptable. This is what helps develop a flaky texture and any cracks can be repaired when rolling it out. 

If you are unsure of just how to roll out your crust, there's a super exciting video below showing you (really, the video is in real time because I find it helpful to learn by watching someone perform a technique I'm unfamiliar with).

For a single crust, fill your pan with your rolled crust, fold over or trim any excess and crimp the edges. 

For a double crust, fill your pan as you would for a single crust, but trim or leave the excess without crimping. Fill the pie and roll out your second (top) crust and cut or decorate how ever you desire. Pinterest is a great resource pie design inspiration!

In Dessert, Pie, Recipe, Basics & Pantry Staples Tags pie dough, pie crust, all butter crust
Comment

Gumbo z'Herbes

November 1, 2016 Sarah Ward

As the weather changes and the air becomes cooler, we get to welcome in a new season of crops - leafy greens and root vegetables! It's bitter sweet, as the tomatoes and berries start to dye off, but I do get excited about the versatility and heartiness that comes with winter's vegetables. This recipe takes full use of those luscious leaves. 

Gumbo z'Herbes (pronounced "zab") is lesser known throughout the country, but is an important dish to Louisiana heritage. Historically a vegetarian gumbo of greens and herbs, it was commonly served on Good Friday (the Friday before Easter) for Catholics fasting or abstaining from eating meat during Lent. While I messed with the heritage by posting this no where near Easter and have sausage + seafood in my recipe, I'm hoping the southern foodways spirits will grant me goodwill since all I'm wanting to do is bring you a delicious and cozy dish for the winter season ahead.  

As mentioned, you'll find my recipe uses sausage, chicken and shrimp because I love all of those things; however, you can easily leave those ingredients out, sub vegetable stock in place of chicken, and still have a mighty tasty stew. If going veggie/vegan, you might try adding in some chunks of potato, turnips, pumpkin and/or white beans after you've pureed the greens. Use just about any edible greens you have growing in your garden or left over from purchasing roots like carrots, turnips, or beets - I guarantee washing them all will be the hardest part of making this dish. Delightfully earthy with a hint of spice, this gumbo is sure to fill you with warmth and satisfaction even on the coldest of days.

Find the recipe on Bonnie Plants website! 

In Entree, Soups and Stews, Winter, Spring, Recipe Tags gumbo, z'herbes, seafood, stew
Comment

Rhubarb Baked Oatmeal

October 22, 2016 Sarah Ward

My brother and sister-in-law recently returned from Iceland and they came back with a (supposed...eh hem) recipe for a traditional rhubarb and oat pie/cake. Since I have yet to see this recipe I will continue to guilt trip them into sharing it with me....especially if Henry wants me to make it for his birthday! Little-sistering aside, I did some research of my own and found a traditional cake called Happy Marriage Cake using rhubarb, jam and an oatmeal based batter. While I'm never one to shy away from cake for breakfast (because you're actually crazy if you do), it's not always the best life choice. So, I let it influence a heart healthy but still super tasty breakfast recipe.

Baked oatmeal is one of my go-to breakfasts for a crowd. It's also a great thing to make ahead for a quick breakfast during the work week. I will admit, I'm not really a big traditional oatmeal fan. If you're with me on team "I hate eating things that make me feel like a baby bird..." then we probably have similar feelings about oatmeal. Baked oatmeal, however, is a love of mine. It's hearty and chewy and not at all watery or porridge like - it's more like eating Thanksgiving dressing (<-- look it up if you're like "um, what?") or a really giant chewy oatmeal bar. I haven't made it enough lately, but I'm happy to have dug out my oatmeal baking mitts to share something warm and hearty with you! 

If you don't have (or like) rhubarb, you can substitute a ton of different fruits - sliced apples, pears, strawberries, persimmons, plums, blueberries, etc. This recipe calls for milk and an egg, but if you want to make it vegan, you can leave the egg out. The oatmeal will have a bit of a looser texture, but that's about the only real difference. I used unsweetened almond milk for my baked oatmeal and it worked really well. Any kind of dairy, nut or grain milk should do. 

Don't forget: Share your baked oatmeal dishes on Instagram with #ofthedirtrecipe or tag @ofthedirt!


Rhubarb Baked Oatmeal

  • 2-3 large stalks of rhubarb
  • 2 cups rolled oats
  • 1/4 cup coconut sugar (or sweetener of your choice)
  • 1/2 tsp ground cardamom
  • 1 tsp ground cinnamon
  • 2 tsp ground ginger
  • 1/4 tsp kosher salt
  • 2 cups milk (cow, almond, soy, etc.)
  • 1 egg
  • 1/2 tsp almond extract
  • 1 tsp vanilla extract
  • Honey (optional)
  • Chopped fruits and nuts for serving (optional)

Spiced Yogurt

  • 5-6 oz Icelandic skyr or greek yogurt (plain or vanilla)
  • 1/4 tsp ground cardamom
  • 1/4 tsp ground cinnamon
  • 1/4 tsp vanilla extract (optional)
  • 1 Tbsp honey (optional)

Preheat your oven to 350 F.

Cut rhubarb into 1-2" lengths. If your stalks are on the thicker side, carefully cut them in half length wise. This will insure they become tender during baking. Set aside.

Combine rolled oats, cardamom, cinnamon, ginger, sugar and salt in a bowl and stir to thoroughly combine. If you are choosing to use a liquid sweetener like maple syrup or honey rather than sugar, wait to add it into the milk. Pour oats into a 9" round baking dish or small casserole pan and spread even.

Whisk together milk, egg, almond and vanilla extract (and liquid sweetener, if appropriate). Pour over the oats. Arrange the rhubarb slices in any decorative manner you wish. 

Cover the pan tightly with foil and bake for 40 minutes. Uncover and bake for an additional 5 minutes. Remove from the oven and rest for 10 minutes. 

While the oatmeal is baking, mix together skyr, spices, extract and honey. Set aside until ready to serve. This can easily be made ahead of time and kept in the fridge.

Serve a scoop of the baked oatmeal, warm, with a loving dollop of spiced skyr, chopped nuts/fruits and a drizzle of honey. 

Yield: 6-8 servings
Baked Oatmeal_Honey Drizzle_small.gif
Baked Oatmeal with Rhubarb_007_sRGB.jpg
In Breakfast, Fall, Recipe, Spring Tags rhubarb, iceland, oatmeal
Comment

Summer Skillet Cobbler

July 7, 2016 Sarah Ward
SHARE ON INSTAGRAM

If you make this recipe (or any others), let me know what you try! Tag 'em on Instagram @ofthedirt with #ofthedirtrecipe or post in the comments below. I love seeing how you make and interpret my recipes - there's always something new for me to learn from y'all!

So, I have a confession. I typically test my recipes three or four times before calling them satisfactory enough to share with you, but even then, they never seem set in stone. I typically find something else I could do differently or tweak or add weeks after posting. This one, though, is on point. I made it a few times, switching out the herbs and the fruit, and it held up every time. The point to me saying this is not to brag, but to encourage you to do the same!

Don't like apricots? Trade them for peaches. Go all-berry (see pictures below). Try lavender or thyme instead of rosemary. Throw in some cinnamon and orange zest. Finish the baked cobbler off with a dusting of powdered sugar and a sprinkle of edible flowers. The cobbler world is your oyster and it's damn tasty. 

  *In light of the the past few weeks' news: Sometimes the world seems dark and full of sadness and none of it makes sense and you want to do something but nothing seems right. I truly believe that food is a way to bring people together - to show love, care, support and unity. So make a cobbler and share it with your neighbor, family or a stranger and let them know that there is good and light in the world too. Sometimes sharing the simple things can be just right.


Summer Skillet Cobbler

Fruit

  • 4 cups summer fruit (a mix of apricots, cherries, blueberries, strawberries and blackberries)
  • 1 tsp vanilla extract
  • 1/4 cup brown sugar
  • 1/2 tsp ground ginger
  • 1/4 tsp ground cardamom
  • 1 Tbsp cornstarch
  • 1 tsp finely chopped rosemary

Batter

  • 1 cup all-purpose flour
  • 1/4 cup almond flour
  • 1/4 cup rolled oats
  • 1/2 cup sugar
  • 1 1/2 tsp baking powder
  • 1/8 tsp kosher salt
  • 1 Tbsp chopped rosemary
  • 2 Tbsp unsalted butter
  • 1 cup milk
  • 1 tsp almond extract

Place a cast iron skillet (a 8-10" cake pan or baking dish will work as well) on a baking sheet in the oven and preheat to 375F. 

Pit, hull, and chop fruit as necessary. Place the fruit in a mixing bowl and combine with vanilla, sugar, ginger, cardamom, cornstarch, and 1 tsp chopped rosemary. Set aside.

In a separate bowl, combine the flour, almond flour, oats, sugar, baking powder, salt and remaining rosemary. Carefully remove the skillet from the oven and add the butter. As the butter is melting, stir the milk and almond extract into the flour mixture just until combined. Give the butter in the skillet a few swirls. Once fully melted, pour in the batter. Add the fruit by pouring it into the center of the skillet and letting the pieces fall into place. If it's slightly domed, that's ok - otherwise, spread towards the outer edges a bit to ensure there is fruit throughout the batter.

Return the skillet to the oven and bake for 35-40 minutes or until the edges are golden brown, the batter is firm and the fruit is bubbling. Remove from the oven and allow to cool for 10 minutes before serving. Serve topped with a dollop of freshly whipped cream, your favorite ice cream or just eat it straight out of the pan (because, YES). 

Yield: 6 - 8 servings
All-berry cobbler - blueberries, blackberries and strawberries.

All-berry cobbler - blueberries, blackberries and strawberries.

In Recipe, Dessert, Summer Tags Cobbler, Strawberries, Cherries, Apricots, Blueberries, Dessert, Blackberries
Comment
← Newer Posts Older Posts →
 

of the dirt blog

I believe there is a necessity for us to be connected to our food. It makes us aware of seasons and life cycles. It reminds us that vital functions on earth are unplugged. It gives us a unique way to express creativity and build community. I hope the recipes and thoughts shared here Inspire you to make something delicious for someone you love (or just yourself!).


BLOG AUTHOR

Sarah Ward is the Editor of Taste of the South magazine. Currently enjoying life in Birmingham, AL with her husband and their polydactyl cat, Jack.

Sarah Ward is the Editor of Taste of the South magazine. Currently enjoying life in Birmingham, AL with her husband and their polydactyl cat, Jack.


search for recipes


Follow @ofthedirt on instagram

This weekend, a group of friends and talented bakers held another bake sale. With a short 7 days of planning and 4 days of advertising, this small group of kickass women raised over $1,000 selling hand pies, cookies, and pastries. To everyone who sup
🎉GIVEAWAY!!! Want to win a free box of homemade pastries?! There are a few ways to win: 

Birmingham Locals: 
1. Tag your local friends below and spread the word about our bake sale fundraiser. Each tag is an entry. TWO winners will be chosen tomorr
HAPPY FALL!!!!!!! It&rsquo;s my favorite time of year and for the first time that I can remember, it actually feels like fall outside in Alabama! To celebrate, make a batch of these Pumpkin Oatmeal Chocolate Chunk Cookies...they use a whole jar of @t
It was 68 degrees here today and everyone was hoarding the fall products at Trader Joe&rsquo;s yesterday (I actually witnessed a woman frantically grab 6 hand soaps, 5 candles, and 3 of every pumpkin-filled-treat thing they had). BUT I&rsquo;ve got o
Quick pickles are one of the best flavor tools to keep on hand. They brighten up any dish - eggs, tacos, toast, salads, chili, sandwiches, pretty much anything that goes with vinegar. And, they&rsquo;re so easy to make! (You don&rsquo;t really even n

Let's Keep in Touch!

Get new recipes delivered right to your email. 

Thank you! Looking forward to staying in touch.

For now, head on over and say hi here. 

© Sarah Ward and of the dirt, 2017. Unauthorized use and/or duplication of the photographs and recipes without express and written permission from this blog’s author and/or owner is strictly prohibited. Excerpts and links may be used, provided that full and clear credit is given to Sarah Ward and of the dirt with appropriate and specific direction to the original content.