• Home
  • Blog
  • Basics + Pantry Staples
  • Preservation
  • Desserts & Sweets
  • Breakfast
  • Entrees & One-dish Meals
  • Salads + Sides
  • Soups & Stews
  • 10 Minute Recipes
  • About
  • Say Hello
  • Portfolio
Menu

of the dirt

Street Address
San Diego, CA
Phone Number
an exploration of food and culture

Your Custom Text Here

of the dirt

  • Home
  • Blog
  • Recipes
    • Basics + Pantry Staples
    • Preservation
    • Desserts & Sweets
    • Breakfast
    • Entrees & One-dish Meals
    • Salads + Sides
    • Soups & Stews
    • 10 Minute Recipes
  • About
  • Say Hello
  • Portfolio

Garlic-Lemon Roasted Chicken

May 8, 2020 Sarah Ward
Garlic+Roasted+Spatchcock+Chicken_020.jpg

Grandma Trigg used to make large dishes of what she called Lemon Chicken for us when my brothers and I were growing. Sometimes she’d make it in the oven, sometimes in her countertop electric skillet. Either way, it was packed full of caramelized onions, garlic powder, lemon juice, olive oil, and a heavy dose of Cavender’s Greek Seasoning. She always made it using bone-in chicken pieces, and it was never served without rice so you had something to sop up all of those flavor-packed pan drippings. It’s definitely near the top of my comfort food list.

These days, we’re eating less meat, but when we do we’re trying to buy from local farms. I’ve taken to purchasing whole chickens because it’s much more affordable, allowing us to be able to support these farms and their practices without breaking the budget. Whole chickens do take longer to cook than pieces, so to make it cook faster, I spatchcocked this one. (Spatchcock is just a fancy word for removing the backbone and flattening it. Serious Eats has a great tutorial if you haven’t done this before!) And, as much as I love a convenient spice like garlic powder, I love roasted garlic cloves and swapped out my grandmother’s go-to with lots of fresh cloves (about 5 heads to be exact!). This roasted chicken is loaded with flavor and will certainly satisfy any comfort food needs.


GARLIC-LEMON ROASTED CHICKEN

Makes 4 to 6 servings

Ingredients

  • 1 (4-pound) whole chicken (let rest at room temperature
    for 30 minutes for more even cooking
    )

  • 1½ teaspoon kosher salt

  • ½ teaspoon ground black pepper

  • 1 teaspoon lemon zest

  • 4 tablespoons olive oil, divided

  • 30 cloves garlic, peeled

  • 2 heads garlic, tops cut off

  • 1 small sweet onion cut into wedges

  • 1 large lemon, half thinly sliced, half reserved

Method

  1. Preheat oven to 425F. 

  2. Place chicken on a cutting board, breast side down. Find the backbone and remove, cutting on either side with kitchen shears. Flip bird over, slightly opening the cut side like a book. Press the heels of your palms in the center of the breasts until the bone snaps. Press until the chicken lies flat. Place chicken, breast side up, in a 13x9-inch baking pan, and tuck wing tips under breasts.

  3. In a small bowl, stir together salt, lemon zest, and pepper. Rub chicken with 2 tablespoons of olive oil, and sprinkle with lemon-pepper mixture. Toss peeled garlic cloves and onion with remaining 2 tablespoon olive oil. Arrange garlic cloves and onion, heads of garlic, and lemon slices around chicken. Squeeze reserved lemon half over onions and garlic.

  4. Bake for 15 minutes. Reduce oven temperature to 400F and continue cooking until skin is golden brown and a meat thermometer registers 165 when inserted in the thickest portion (between breast and thigh). Remove from oven. Let chicken rest for 10 minutes before cutting.

Garlic%2BRoasted%2BSpatchcock%2BChicken_018.jpg
Garlic+Roasted+Spatchcock+Chicken_014.jpg

We enjoyed this sliced and served over couscous mixed with fresh herbs and topped with the roasted garlic and onions and a drizzle of pan drippings.


Save the Bones and Make Stock

The benefits of cooking a whole chicken go beyond enjoyment of the initial roast. The bones offer so much flavor and goodness that they absolutely shouldn’t be wasted! Pick all of the meat off the bones and combine them with a quartered onion, roasted garlic skins or a new head of garlic, celery or parsley if you have any, any remaining roasted lemon slices, a teaspoon of black peppercorns and a few bay eaves. Cover with water. Bring to a gentle simmer and let cook partially covered for 2 to 3 hours. Strain and discard solids. Stock can be frozen for several months or refrigerated and used within a week.

Don’t have time to make stock right away? Freeze the bones along with any vegetable scraps from cooking and make stock when you’re ready. Just respect the animal and don’t waste those bones.

In Entree, Heirloom Recipes, One Dish Meals, Recipe Tags chicken, dinner
Comment

Peach Grilled Cheese

July 8, 2018 Sarah Ward
Peach-Basil Grilled Cheese_028_sRGB.jpg

I have to admit, I'm much more of a fall and winter person. I don't particularly love hot weather or being eaten by bugs when stepping foot outside. I do, however, have a great appreciation for Summer's necessity in our food system, and peaches are what make the heat and humidity worth it. For the past seven summers, I've roamed San Diego's market in search of sweet and juicy peaches. My wanderings have led me to some good finds - floral white peaches from Sweet Tree Farms, sweet donut (or Saturn) peaches from Jacey's Farm, and a young crop of little ones from Good Taste Farm. Each delicious and flavorful in their own way. However, I still found myself longing for the peaches that grow about an hour south of my hometown - big, juicy, rosy-cheeked Chilton County yellow peaches. I love these peaches so much that when we'd take a trip back to Alabama in the summer, I'd designate my carryon bag to be filled solely with these (carefully packed) peaches.

This summer, I find myself back to living about an hour north of these orchards. And while I also find myself deeply missing my San Diego market wanderings, I am loving the ability to drive to the nearest farm stand or Pepperplace Farmer's Market to buy a few pounds. What I love most  about peaches is their ability to go between sweet and savory applications seamlessly, more so that any other summer produce (in my opinion). From pizza topping to ice cream, caprese salads to skillet cakes, peaches can (and should) be enjoyed in as many forms as possible while in peak season. 

One of my favorite ways to enjoy them is in a grilled cheese. Paired with a fresh herb, some soft cheeses, a salty cured meat or pickle, and a zip from spice or vinegar, it's an unbeatable quick lunch especially post farmer's market shopping when you're looking for the fastest way to get from produce basket to tastebuds. I've written up what's essentially a non-recipe and more of a guide for using what you have on hand to make one delicious sweet and savory sandwich. 


Peach Grilled Cheese

  • Thick sliced sourdough or your favorite bread
  • Soft cheese (cream cheese, labneh, goat)
  • Sliced or grated melting cheese (mozzarella, brie, gruyere)
  • Sliced cured meat, pickles, or other fresh produce
  • Fresh peach, thinly sliced
  • Fresh herbs
  • Condiments: Preserves, vinegar glaze, hot sauce
  • Ghee, butter, or oil

Start by spreading your bread slices with the soft cheese. Then, start stacking your ingredients on one bread slice. (I like to alternate ingredients, dispersing the melting cheese amongst the rest so that everything melds together when being grilled.) Drizzle over your condiment(s), and top with the remaining bread slice.

Heat a teaspoon of ghee in a pan over medium-low heat until melted. Swirl to coat. Add your sandwich and cover; cook for 3 minute undisturbed. Lift slightly with a spatula to see if bread is browned. Continue cooking, covered until it's toasted to your preference. Flip, and cover, and repeat. When toasted to your preference, remove the sandwich and let it stands for a few minutes before slicing. This will help it set slightly so it doesn't fall apart when eating. 


Some of my preferred flavor combinations are below!

PEACH-BASIL (pictured)

Brie & labneh
Basil
Salami
Pepper jelly

Peach Caprese

Goat cheese & gruyere
Tarragon or chives
Thinly sliced heirloom tomato
Balsamic glaze
 

Peach-Chipotle

Cream cheese & mozzarella
Cilantro
Red onion
Chipotle hot sauce

Peach-Basil Grilled Cheese_001_sRGB.jpg
In 10 Minute Recipes, Summer, Entree Tags Peaches, Sandwich
Comment

Savory Tomato Cobbler

September 21, 2017 Sarah Ward
Savory Tomato Cobbler_074_sRGB.jpg

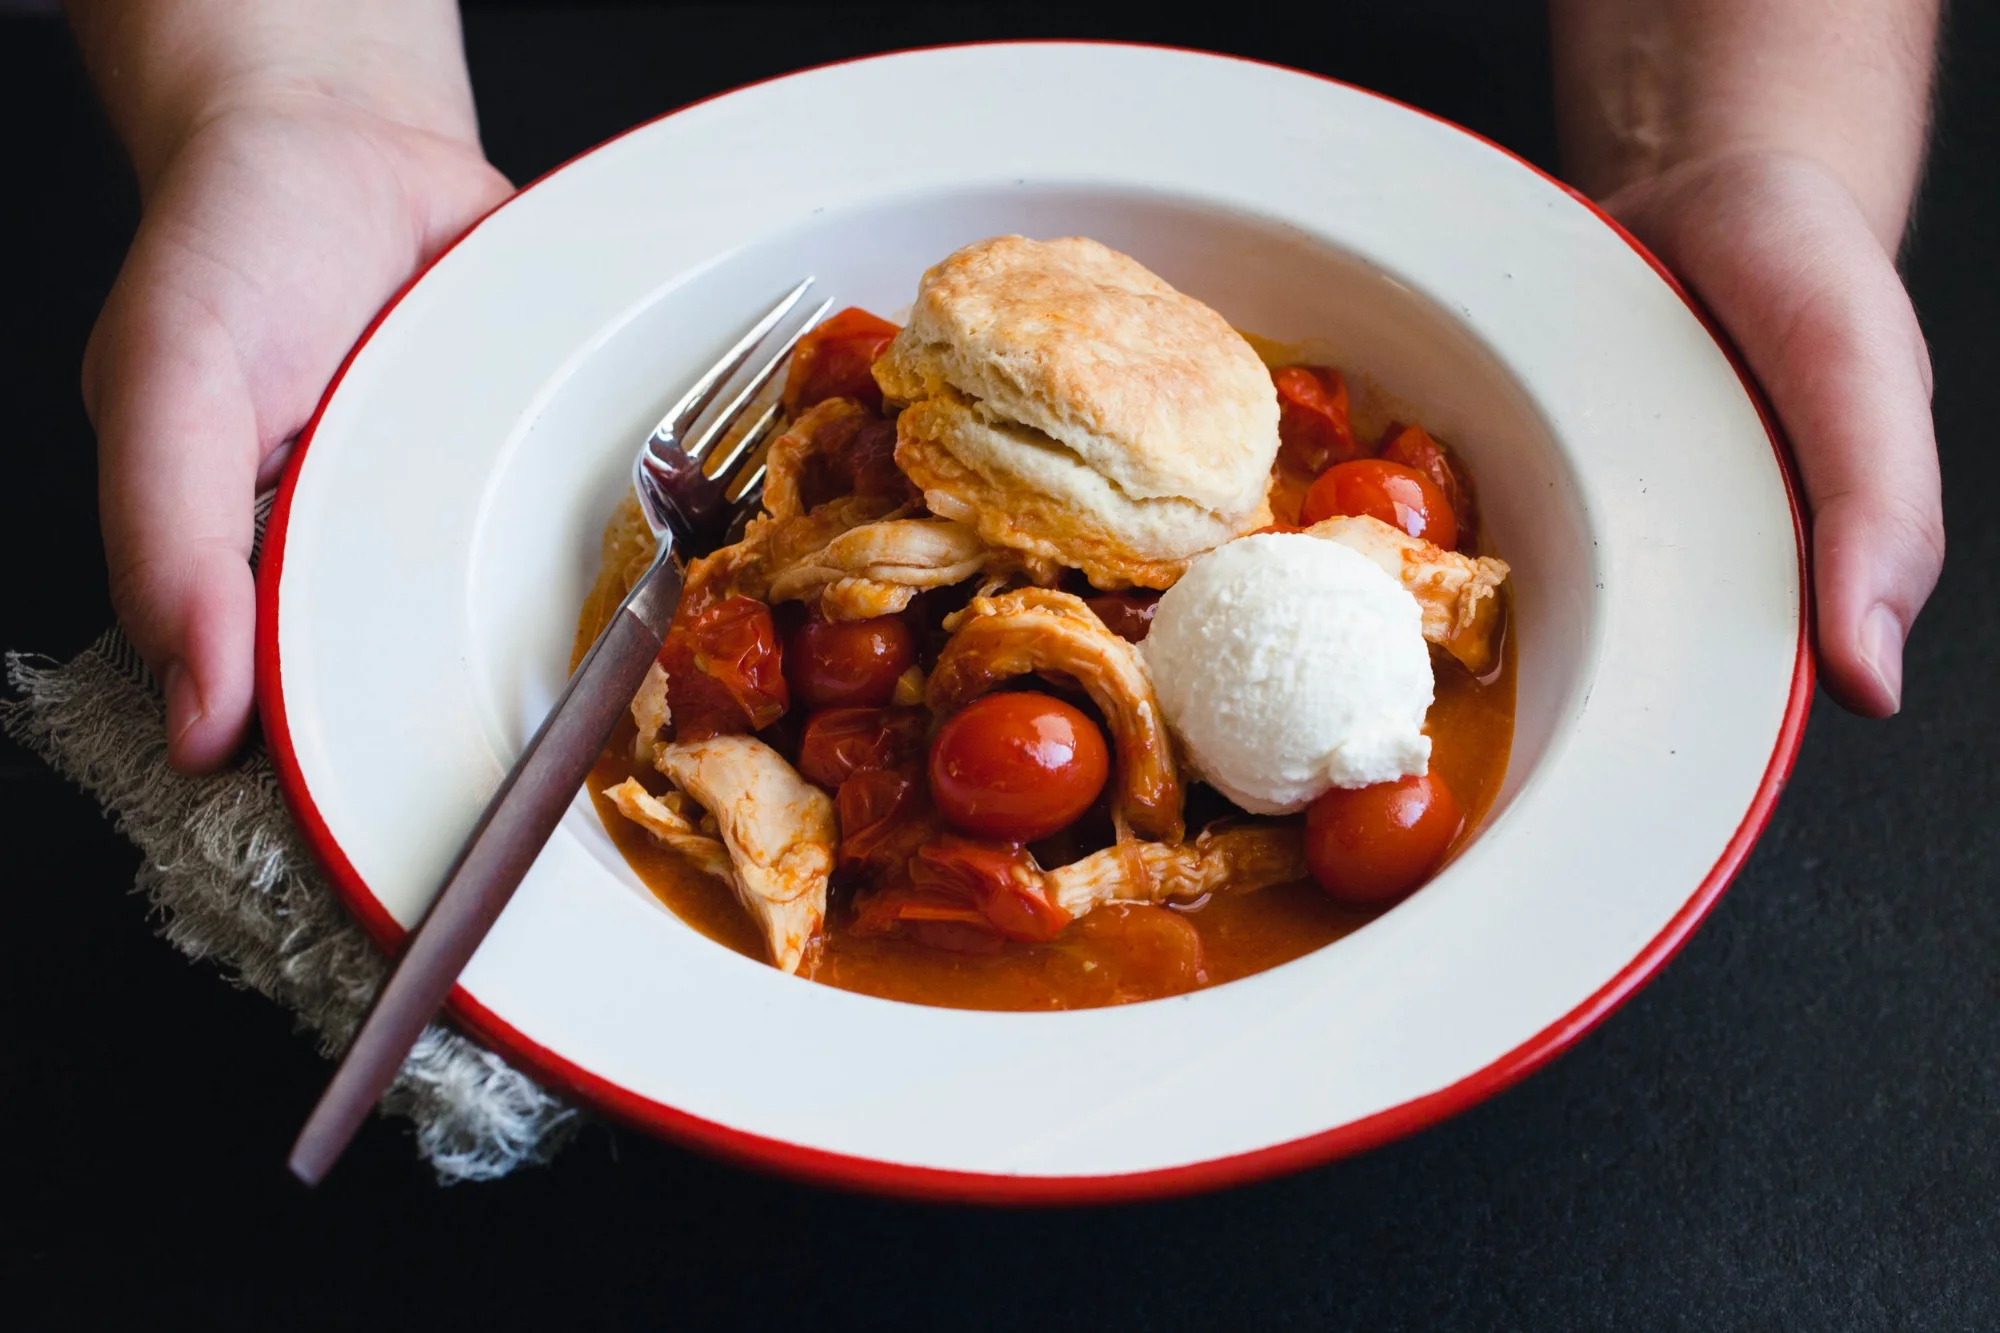
I used to work for a non-profit that sent me on wild and sometimes odd adventures around the country. One of those times I was flying back to San Diego from a wedding and was asked to get off the plane and meet up with one our traveling teams in the southeast. I ended up in downtown Atlanta, in an industrial loft of friends of a friend, singing "Wagon Wheel," making food, and dreaming about tomato cobbler. I can't remember the conversation trail to how this idea came about, but it's been in the back of my mind since. While there are many things that I love about living in California, my southern roots miss the warm, carb-topped comfort foods that epitomize the South. Tomatoes, chicken, and biscuits are pretty humble staples of southern cuisine, but plenty of magic can be made from them. This warm and savory cobbler, with a hint of spicy harissa, is the perfect transitional dish from late summer into those early fall, cool nights.

I've included a few variations to this dish, as the both the filling and biscuits recipes can work on their own. The cobbler can easily be made vegetarian by skipping the chicken and going straight tomato or subbing for vegetables like roasted zucchini and cauliflower. You can also short-cut this recipe by using store-bought biscuit dough (but trust me, if you have the extra time, it's worth using scratch-made biscuits). 


Savory Tomato Cobbler

COBBLER FILLING

  • Olive oil
  • 1 lb boneless chicken (optional)
  • 2 Tbsp sherry or wine vinegar
  • 1 small white onion, halved and thinly sliced
  • 4 garlic cloves
  • 1 1/2 tsp ground cumin
  • 1 tsp ground fennel seeds
  • 4-6 tsp harissa paste
  • 2 lbs of heirloom cherry tomatoes
  • 3 Tbsp cane sugar
  • Zest of 1 lemon
  • 1/2-1 tsp kosher salt
  • 1 Tbsp + 1 tsp cornstarch
  • Biscuit Topping (recipe follows)
  • Heavy cream or ricotta for serving (optional)

Heat a wide pot or large and deep skillet over a medium flame and add two tablespoons of oil. Brown the chicken for 5-6 minutes on each side. Set aside. 

Reduce heat to medium-low and deglaze the pan with 1 tablespoon of vinegar. Add another tablespoon or two of oil to the pan and stir in the onions. Cook for 10-15 minutes, stirring occasionally until the onions soften and start to turn translucent. While the onions are cooking, mince the garlic and cut about three-quarters of the tomatoes in half, leaving a handful or two whole. 

When the onions have softened, add the minced garlic, cumin, fennel, and harissa. Stir and toast the spices until fragrant (about a minute). Add in the tomatoes and sugar, stirring until combined. Heat until the juices come to a soft simmer. Continue simmering for 20 minutes to reduce the tomatoes and lower the heat if the juices begin to boil or come to a hard simmer. Gently stir on occasion to keep them from burning, taking care to not break down the tomato piece too much. After 20 minutes, mix in the remaining tablespoon of vinegar, lemon zest and half a teaspoon of salt. Taste and add additional salt, if necessary.

Shred the chicken and fold into the tomatoes. Mix cornstarch with a tablespoon of water and add to the tomato mixture. Simmer for a few minutes, until the mixture starts to thicken. Remove from the heat. Fill a 10” deep dish pie pan, cast iron skillet, or other oven-proof dish of similar size with the mixture. Set aside.

Preheat your oven to 400℉. Make the biscuit topping (instructions below) and place biscuits over the tomato filling, leaving a few small gaps for the cobbler to release moisture as it bakes. Brush the tops with the remaining tablespoon of milk. Place in the middle rack of your oven with a baking sheet or piece of foil underneath to catch any bubbling. Bake for 20-25 minutes or until the tops of the biscuits are a nice golden brown and the cobbler is bubbling on the edges. 

Remove and serve warm in a bowl with a small pour of heavy cream or scoop of ricotta. 

BISCUIT TOPPING

  • 2 1/4 cups all-purpose flour + some for dusting
  • 2 tsp baking powder
  • 1/4 tsp baking soda
  • 1 tsp cane sugar
  • 1 ½ tsp kosher salt
  • 6 Tbsp cold butter, cut into small cubes
  • 1/2 cup whole milk ricotta cheese or sour cream 
  • 1/2 cup whole or buttermilk + 1 Tbsp set aside

In the bowl of a food processor, combine all dry ingredients, minus the butter, and pulse to thoroughly combine. Add the butter and pulse a few times until the largest pieces are the size of English peas. The texture should be crumbly with only a small number of big butter pieces. You can also use work the butter in with a pastry cutter or by hand (like you would for a pie crust) if preferred.

Pour dry mix into a large mixing bowl. Whisk the ricotta and milk together until the texture is mostly smooth. Pour a third over the flour mixture and begin gently folding everything together with a fork, just until the wet and dry ingredients are beginning to come together. Continue in thirds until the milk is fully incorporated. At this point, you will finish the process mostly by hands (things will get a bit messy, but that's part of the fun). Knead a few times by hand until the shaggy dough starts to form a single mass. The dough will look a bit dry and crumbly. 

Lightly flour a smooth surface and turn out the dough. Gently fold the mixture together a few times to incorporate most of the dry goods. Press into a 1.5-2” thick rectangle, working any bits of dry goods left into the sticky areas of dough. Cut the dough in half, crosswise, using a bench scraper or knife. Stack one half on top of the other and press down to flatten a bit. Sprinkle the dough and work surface with additional flour, if needed, to help keep the dough from sticking to your hands or the work surface. Roll the dough to 1” thick rectangle. Cut the biscuits into squares with a knife or circles with a round biscuit or cookie cutter. The dough should yield 8 pieces. Use any scraps to fill major gaps in the cobbler top, or reform into a small biscuit and bake separately for a cook’s treat. 


VARIATIONS

Chutney: Skip using the chicken and begin the recipe until you start simmering the tomatoes. Extend the simmer time to 40-50 minutes, stirring frequently, until they become thick like preserves. The tomatoes are done when you can pull a spoon across the bottom of the pan and it creates a clear trail with the tomatoes flowing back in to fill the space in a second or two. Add the remaining vinegar and half a teaspoon of salt. Taste and adjust seasoning if desired. Remove from heat and transfer to sterilized jars for water bath preserving, or an airtight container and refrigerate for up two weeks.  

Biscuits: Make dough as directed until forming the initial rectangle. Cut into quarters and stack each on top of each other. Press down to flatten a bit. Sprinkle the dough and work surface with additional flour, if needed, to help keep the dough from sticking to your hands or the work surface. Roll the dough to 1.5” thick rectangle. Cut the biscuits into squares with a knife or circles with a round biscuit or cookie cutter. 

Place on a lined baking sheet 1-2” apart and brush the tops with remaining tablespoon of milk or melted butter. Bake on the middle oven rack for 20-25 minutes or until a deep golden brown on top. Remove from the oven and carefully move the biscuits to a cooling rack. Enjoy, hot, with soft butter and drizzled honey or a generous slather of tomato chutney.

Savory Tomato Cobbler_001_sRGB.jpg
Savory Tomato Cobbler_040_sRGB.jpg
Savory Tomato Cobbler_059_sRGB.jpg
In Entree, Fall, One Dish Meals, Recipe, Summer Tags Cobbler, Tomatoes
Comment

Grandma Trigg's Cuban Black Beans

January 13, 2017 Sarah Ward

If you’ve arrived here without reading the short essay introduction, I encourage you to head over there - it really is short, I promise. If you’ve arrived here from there, I have to tell you that, for me, these beans come with so many more memories than just those of culture and heritage. Not too long after she learned to cook, my grandmother forced an untimely kitchen renovation while cooking these beans in a pressure cooker...which exploded, starting a fire in said kitchen. Or the time she managed to include some accidental ingredients in them like picture hanging wall hooks - her own unintentional version of King's Cake. Thankfully, my brother Henry didn't swallow it; however, to his dismay, he also hadn’t won a prize.  But there are also the times she would make pot after pot of beans just to give away to people who needed a hot meal. Or, all the times she would slip Jennifer (her cat..) pieces of the roasted pork she would always make along with these beans. I promise this recipe comes picture-hanger-free but with all the love of my grandmother.

This is me at the 5th grade International Fair (hellllo 90s eye glasses) setting up a table about Cuba and passing out samples of Grandma's black beans.

This is me at the 5th grade International Fair (hellllo 90s eye glasses) setting up a table about Cuba and passing out samples of Grandma's black beans.

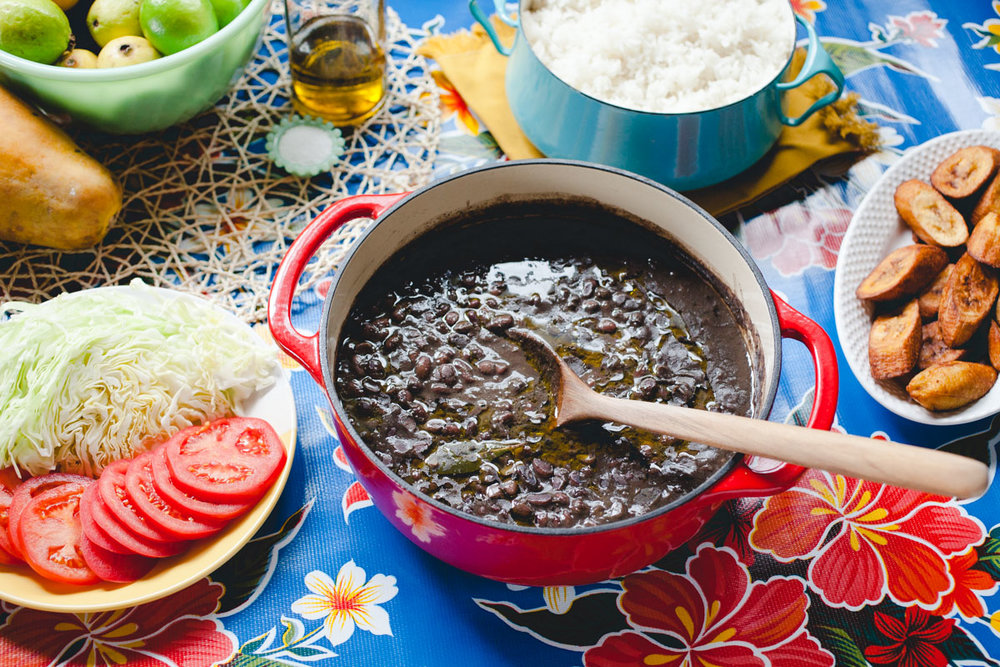
There has to be some intentional ironic metaphor in here from Grandma about aging, but these beans really do get better with time. I recommend making them the day before you plan on eating (and hopefully sharing) them, or at least cook them and let them rest for several hours before serving. You can obviously eat them right away but trust me, it’s worth the extra bit of patience and time. I typically make a double batch so that I can freeze a few containers. They’re so easy to heat up for a quick meal, and the flavor is that much better.

Traditionally, these beans are served over white rice with fried sweet (ripe) plantains, green salad or fresh cabbage, roasted Cuban style pork and mojo covered yuca. If you forgo the whole feast, I suggest at least serving with plantains or salad, but definitely over rice. Freeze any leftovers or keep them in the fridge for up to two weeks and stir in an additional teaspoon or two of balsamic vinegar when reheating.


Grandma Trigg’s Cuban Black Beans

Makes 8 to 10 servings

ingredients

  • 3 tablespoons olive oil

  • 1 small sweet onion, diced

  • 1 bell pepper, diced

  • 1 head of garlic, peeled and minced (yes, for real; 2 if you’re a garlic lover, like me)

  • 3 cups dried black beans

  • 5 cups water

  • 3 tablespoons freshly ground cumin (4 Tbsp if using pre-ground)

  • 4 teaspoons dried oregano

  • 2 bay leaves

  • 6 tablespoons balsamic vinegar

  • 1 - 2 teaspoons kosher salt

method

  1. Heat the olive oil in a large pot over medium heat and add the onions, peppers and garlic. Sauté for about 5 minutes, just until the onions and peppers start to soften and release their juices. Add the ground cumin and continue sautéing for a couple of minutes.

  2. Add the beans, oregano, bay leaves and water. Stir until all of these ingredients are well combined. Reduce the heat to the lowest setting and slowly bring to a low simmer. Cover and continue cooking until the beans have softened to your liking, about 2 hours. Try to keep the pot at a low simmer rather than a boil. If you find the beans start to boil with the lid on, just remove the lid and stir often. Add additional water, if needed.

  3. Once the beans are cooked to your preference, add the balsamic vinegar and 1 tsp salt. Cook, uncovered, for 5 minutes. Add any additional salt to taste. Cook for another 20 minutes, if you want your beans thicker rather than soupy. Beans can be served right away, but for better flavor, turn off the heat and let them rest for a few hours or overnight. Reheat and finish off with a healthy drizzle of olive oil before serving.

You can use canned black beans instead of dried if you don’t have time to plan ahead. Sub four 12 oz cans (drained) for the dried beans and add 4 cups of water or enough to just cover the beans.

If you haven't ever cooked with dried black beans, please note that different varieties will lose a varying amount of their deep color. You haven't done anything wrong if your beans start to look reddish brown or even grey as they cook. They will darken as they sit/cool, but still may lose some of their black tone. They'll taste delicious either way. Personally, I’ve found Camellia brand dried beans best for maintaining color and cooking faster.


Grandma in Cuba - 1946

Grandma in Cuba - 1946

Grandma in Alabama - late 1990s

Grandma in Alabama - late 1990s

Cuban Black Bean
Print

Cuban Black Bean

Yield: 8 to 10
Author: Sarah Ward

Ingredients:

  • 3 tablespoons olive oil
  • 1 small sweet onion, diced
  • 1 bell pepper, diced
  • 1 head of garlic, peeled and minced (yes, for real; 2 if you’re a garlic lover, like me)
  • 3 cups dried black beans
  • 5 cups water
  • 3 tablespoons freshly ground cumin (4 Tbsp if using pre-ground)
  • 4 teaspoons dried oregano
  • 2 bay leaves
  • 6 tablespoons balsamic vinegar
  • 1 - 2 teaspoons kosher salt

Instructions:

  1. Heat the olive oil in a large pot over medium heat and add the onions, peppers and garlic. Sauté for about 5 minutes, just until the onions and peppers start to soften and release their juices. Add the ground cumin and continue sautéing for a couple of minutes.
  2. Add the beans, oregano, bay leaves and water. Stir until all of these ingredients are well combined. Reduce the heat to the lowest setting and slowly bring to a low simmer. Cover and continue cooking until the beans have softened to your liking, about 2 hours. Try to keep the pot at a low simmer rather than a boil. If you find the beans start to boil with the lid on, just remove the lid and stir often. Add additional water, if needed.
  3. Once the beans are cooked to your preference, add the balsamic vinegar and 1 tsp salt. Cook, uncovered, for 5 minutes. Add any additional salt to taste. Cook for another 20 minutes, if you want your beans thicker rather than soupy. Beans can be served right away, but for better flavor, turn off the heat and let them rest for a few hours or overnight. Reheat and finish off with a healthy drizzle of olive oil before serving.

Notes:

You can use canned black beans instead of dried if you don’t have time to plan ahead. Sub four 12 oz cans (drained) for the dried beans and add 4 cups of water or enough to just cover the beans. If you haven't ever cooked with dried black beans, please note that different varieties will lose a varying amount of their deep color. You haven't done anything wrong if your beans start to look reddish brown or even grey as they cook. They will darken as they sit/cool, but still may lose some of their black tone. They'll taste delicious either way. Personally, I’ve found Camellia brand's dried beans best for maintaining color. Traditionally, these beans are served over white rice with fried sweet (ripe) plantains, green salad or fresh cabbage, roasted Cuban style pork and mojo covered yuca. If you forgo the whole feast, I suggest at least serving with plantains or salad, but definitely over rice.

Calories

336.78

Fat (grams)

6.72

Sat. Fat (grams)

1.02

Carbs (grams)

54.24

Fiber (grams)

12.44

Net carbs

41.81

Sugar (grams)

5.89

Protein (grams)

16.95

Sodium (milligrams)

417.25

Cholesterol (grams)

0.00
Did you make this recipe?
Tag @ofthedirt on instagram and hashtag it #ofthedirtrecipes
Created using The Recipes Generator
In Entree, Recipe, Vegan, Vegetarian, Heirloom Recipes Tags Black Beans, Cuba, Heirloom Recipe, vegetarian, vegan, food, authentic cuban black beans, cuban black beans
2 Comments

Gumbo z'Herbes

November 1, 2016 Sarah Ward

As the weather changes and the air becomes cooler, we get to welcome in a new season of crops - leafy greens and root vegetables! It's bitter sweet, as the tomatoes and berries start to dye off, but I do get excited about the versatility and heartiness that comes with winter's vegetables. This recipe takes full use of those luscious leaves. 

Gumbo z'Herbes (pronounced "zab") is lesser known throughout the country, but is an important dish to Louisiana heritage. Historically a vegetarian gumbo of greens and herbs, it was commonly served on Good Friday (the Friday before Easter) for Catholics fasting or abstaining from eating meat during Lent. While I messed with the heritage by posting this no where near Easter and have sausage + seafood in my recipe, I'm hoping the southern foodways spirits will grant me goodwill since all I'm wanting to do is bring you a delicious and cozy dish for the winter season ahead.  

As mentioned, you'll find my recipe uses sausage, chicken and shrimp because I love all of those things; however, you can easily leave those ingredients out, sub vegetable stock in place of chicken, and still have a mighty tasty stew. If going veggie/vegan, you might try adding in some chunks of potato, turnips, pumpkin and/or white beans after you've pureed the greens. Use just about any edible greens you have growing in your garden or left over from purchasing roots like carrots, turnips, or beets - I guarantee washing them all will be the hardest part of making this dish. Delightfully earthy with a hint of spice, this gumbo is sure to fill you with warmth and satisfaction even on the coldest of days.

Find the recipe on Bonnie Plants website! 

In Entree, Soups and Stews, Winter, Spring, Recipe Tags gumbo, z'herbes, seafood, stew
Comment
Older Posts →
 

of the dirt blog

I believe there is a necessity for us to be connected to our food. It makes us aware of seasons and life cycles. It reminds us that vital functions on earth are unplugged. It gives us a unique way to express creativity and build community. I hope the recipes and thoughts shared here Inspire you to make something delicious for someone you love (or just yourself!).


BLOG AUTHOR

Sarah Ward is the Editor of Taste of the South magazine. Currently enjoying life in Birmingham, AL with her husband and their polydactyl cat, Jack.

Sarah Ward is the Editor of Taste of the South magazine. Currently enjoying life in Birmingham, AL with her husband and their polydactyl cat, Jack.


search for recipes


Follow @ofthedirt on instagram

This weekend, a group of friends and talented bakers held another bake sale. With a short 7 days of planning and 4 days of advertising, this small group of kickass women raised over $1,000 selling hand pies, cookies, and pastries. To everyone who sup
🎉GIVEAWAY!!! Want to win a free box of homemade pastries?! There are a few ways to win: 

Birmingham Locals: 
1. Tag your local friends below and spread the word about our bake sale fundraiser. Each tag is an entry. TWO winners will be chosen tomorr
HAPPY FALL!!!!!!! It’s my favorite time of year and for the first time that I can remember, it actually feels like fall outside in Alabama! To celebrate, make a batch of these Pumpkin Oatmeal Chocolate Chunk Cookies...they use a whole jar of @t
It was 68 degrees here today and everyone was hoarding the fall products at Trader Joe’s yesterday (I actually witnessed a woman frantically grab 6 hand soaps, 5 candles, and 3 of every pumpkin-filled-treat thing they had). BUT I’ve got o
Quick pickles are one of the best flavor tools to keep on hand. They brighten up any dish - eggs, tacos, toast, salads, chili, sandwiches, pretty much anything that goes with vinegar. And, they’re so easy to make! (You don’t really even n

Let's Keep in Touch!

Get new recipes delivered right to your email. 

Thank you! Looking forward to staying in touch.

For now, head on over and say hi here. 

© Sarah Ward and of the dirt, 2017. Unauthorized use and/or duplication of the photographs and recipes without express and written permission from this blog’s author and/or owner is strictly prohibited. Excerpts and links may be used, provided that full and clear credit is given to Sarah Ward and of the dirt with appropriate and specific direction to the original content.